.png)
The Tower of Babel Scramble near Moraine Lake in Banff National Park
- Jun 12, 2025
- 9 min read
Updated: Sep 4, 2025

I’d seen the Tower of Babel plenty of times during a Moraine Lake hike. That dramatic rock formation rising straight up behind the lake is hard to miss, but until recently I had no idea you could actually scramble to the top of it!
Since the route was too tough for our kids, a friend and I gave it a try this spring after cycling to the lake the day before the road opened to traffic. It turned out to be one of the most rewarding short scrambles I've done in the Rockies.
But to be clear, this isn’t your average hike and it's not for everyone. It's a proper Canadian Rockies scramble: steep, loose, and hands-on almost the entire way.
If you’ve got some scrambling experience and you’re up for a challenge, the views from the top are absolutely worth it. Moraine Lake looks even more surreal from above, and the best part is that hardly anyone makes it up there.
In this post I’ll walk you through everything you need to know about the Tower of Babel scramble, including how to find the trail, what to expect on the route, and whether it’s a good fit for your group.
Table of Contents
To jump ahead to a certain section, click the links below:
Table of Contents:
Tower of Babel Scramble - Key Information
In a rush? Here's some key information about the scramble at a glance.
Distance: About 2.9 km round trip
Elevation Gain: 518 m
Difficulty: Moderate to challenging scramble
Time: 2 to 3 hours total (including breaks)
Best Time to Go: June to September
Permits: Banff National Park pass required. We have written a Q&A to answer all questions about the pass here.
Kids: Not recommended - too steep and technical
Dogs: Not recommended
How to Get to Moraine Lake

Getting to the Tower of Babel scramble requires a bit of planning, as access to Moraine Lake is limited. The road to the lake is closed to all vehicles from mid-October through early June, making it inaccessible for much of the year.
In the winter, people do hike and cross-country ski along the road, but its recommended to not go all the way to the lake, as the route crosses an avalanche-prone area - and the scramble would be inaccessible anyway.
Even in the summer months, personal vehicles are no longer allowed, so you'll need to book a Parks Canada shuttle, a commercial tour, or make your way in by foot or bike.
If you’re trying to figure out how to fit Moraine Lake into your travel plans, our two-week Canadian Rockies itinerary includes the best ways to work it into your route.
We’ve also written a full guide on how to cycle to Moraine Lake if you haven’t been able to book a shuttle or just want to ride in instead.
Tower of Babel Scramble Map:
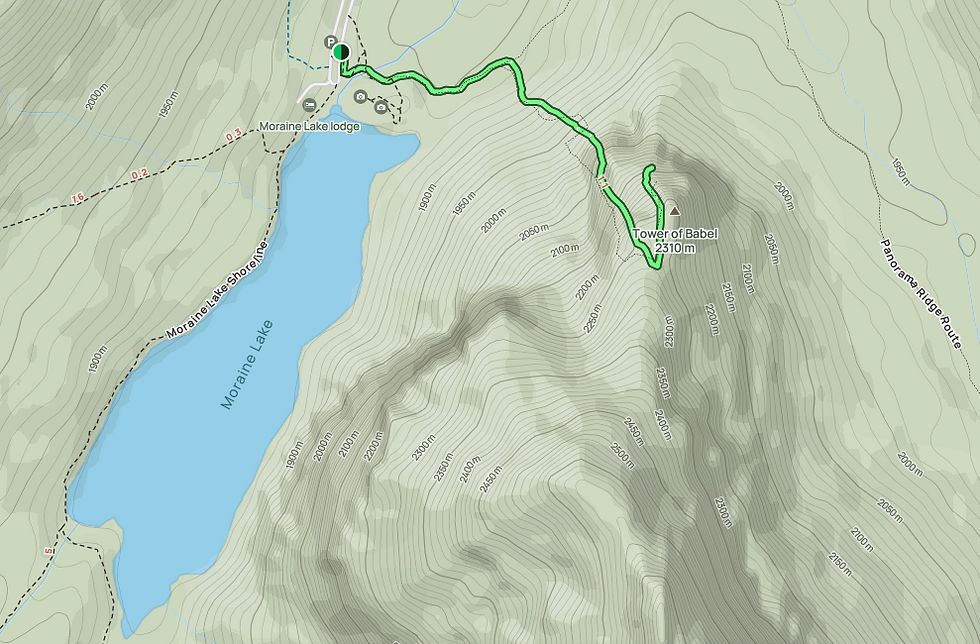
Finding the Start of the Scramble
This is not an official hiking trail, so you won't find it on any of the information boards that mention other hikes in the area.
To find the start of the scramble from the Lake, head toward the popular Rockpile viewpoint (the trail is clearly signposted), along a paved path.


After snapping a few photos at the viewpoint, continue along the path called the Panorama Ridge trail, which takes you in the direction of Consolation Lake (a lake which you will get stunning views of, in around 90 minutes).

You will know you are on the right path if you pass this bear sign - which is a timely reminder to ensure that you are 'bear aware', by hiking in groups, carrying bear spray and knowing how to use it. This is definitely bear country.
Continue along this route for a few hundred metres until you see an opening in the trees on your right. This is where the scramble begins and you will see the tower looming.
I recommend using AllTrails to ensure you turn off at the right spot. There are a few indicators, like a ribbon tied to one of the trees, but it’s not particularly obvious.

That said, your objective is clear. You’re aiming for the gully on the right-hand side of the Tower of Babel. It’s a bit of a 'choose your own adventure' through the scree, but in this case, all paths lead in the same direction - up.

The Steep Scree Climb
As you leave the main trail, this is where the hard work begins. There isn't really a defined path and the boulders are large, loose underfoot, and somewhat awkward to navigate. It’s a challenging section and it drains your energy.
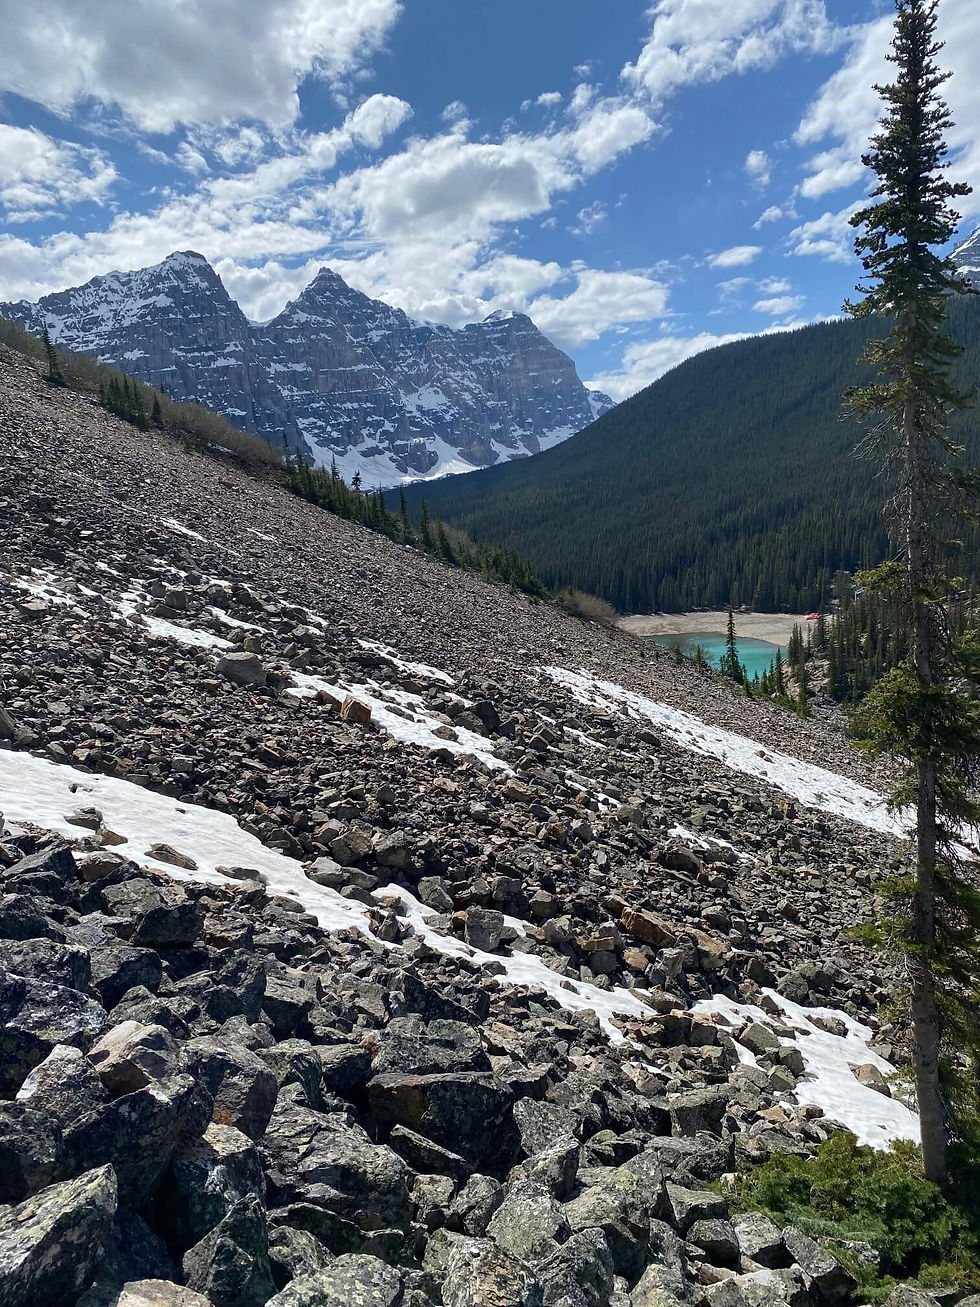
As you gain elevation, you can either continue climbing over the larger boulders or make your way up the scree. If possible, I recommend sticking with the boulders. The scree is tough to climb, and for every step you take forward, it often feels like you slide half a step back.

In the photo below, you can see the route we took - we headed straight up the middle (just to the left of the tall pine tree) to avoid as much scree as possible.

Once you have past the trees, the boulders become smaller and the terrain shifts almost entirely to scree as you enter the chute.

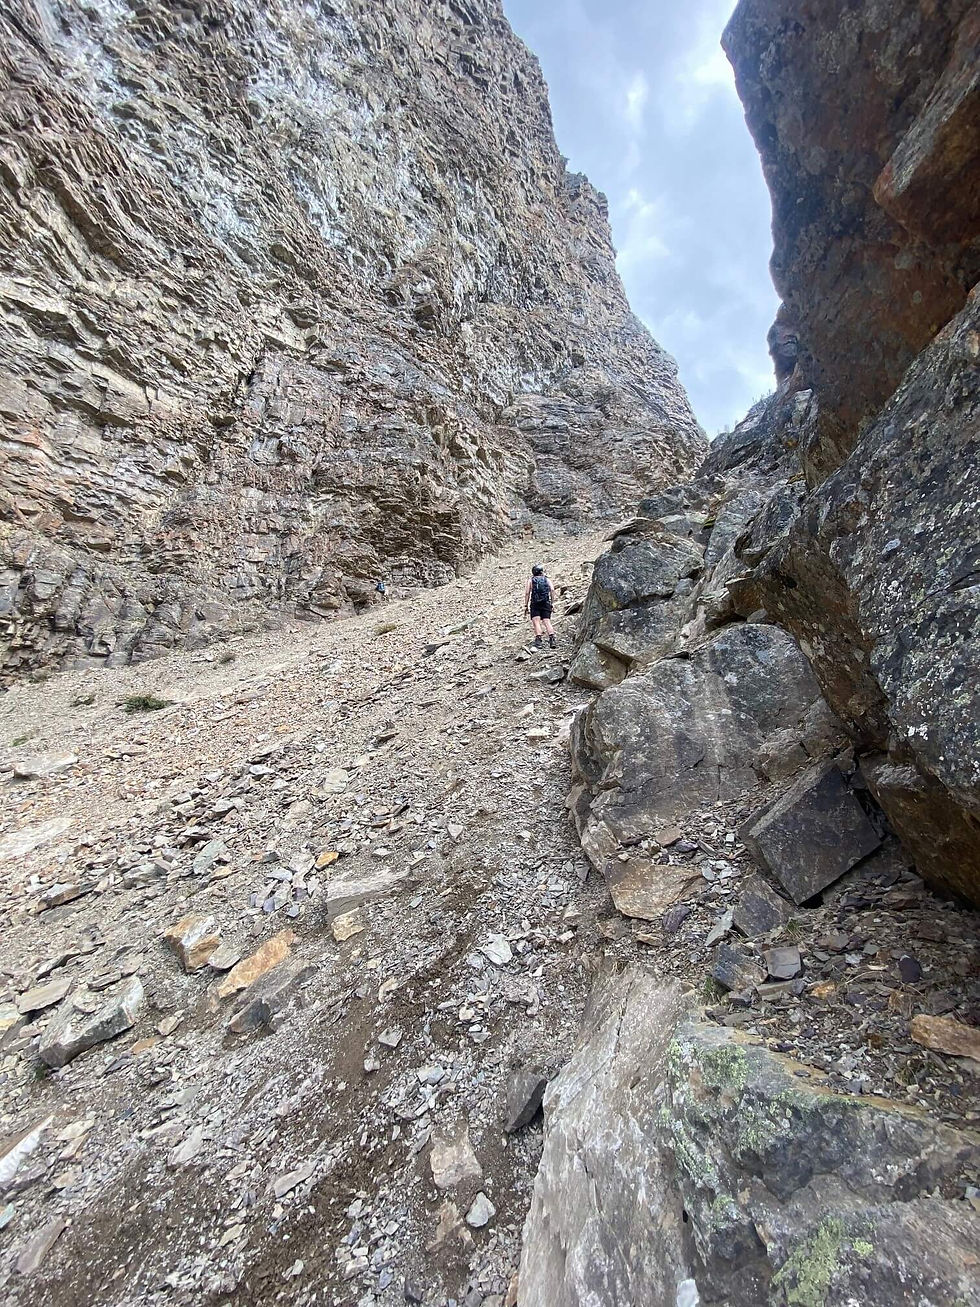
Navigating the Chute
☝️ Safety Tip: If you haven’t already, make sure that you put on your helmet before entering the chute. Loose rock is common, and there's a real risk of falling debris from hikers making their way down above you.

Once inside the chute, it’s best to stay on the right-hand side. The left is mostly loose scree and difficult to get traction on, while the right has larger, more stable rocks that give you something to grip as you climb.

Using your hands here makes the climb more manageable and it was by far the most fun part of the scramble for us. It’s much easier than trying to push straight up the scree in the middle. There are plenty of rocks that you can sit on to have a rest as well.
As you get closer to the top, the rocks become larger and more jagged, and there’s really no choice but to do a bit of light rock climbing to navigate the final section.
We had some snow near the top in late May, which made it a little sketchy, but with careful foot placement we were fine. Once you're past that section, you're just minutes from the summit, as the hardest part is already behind you.
You can see what the final stretch of the climb looks like in the Shorts on our YouTube channel.
At the Summit
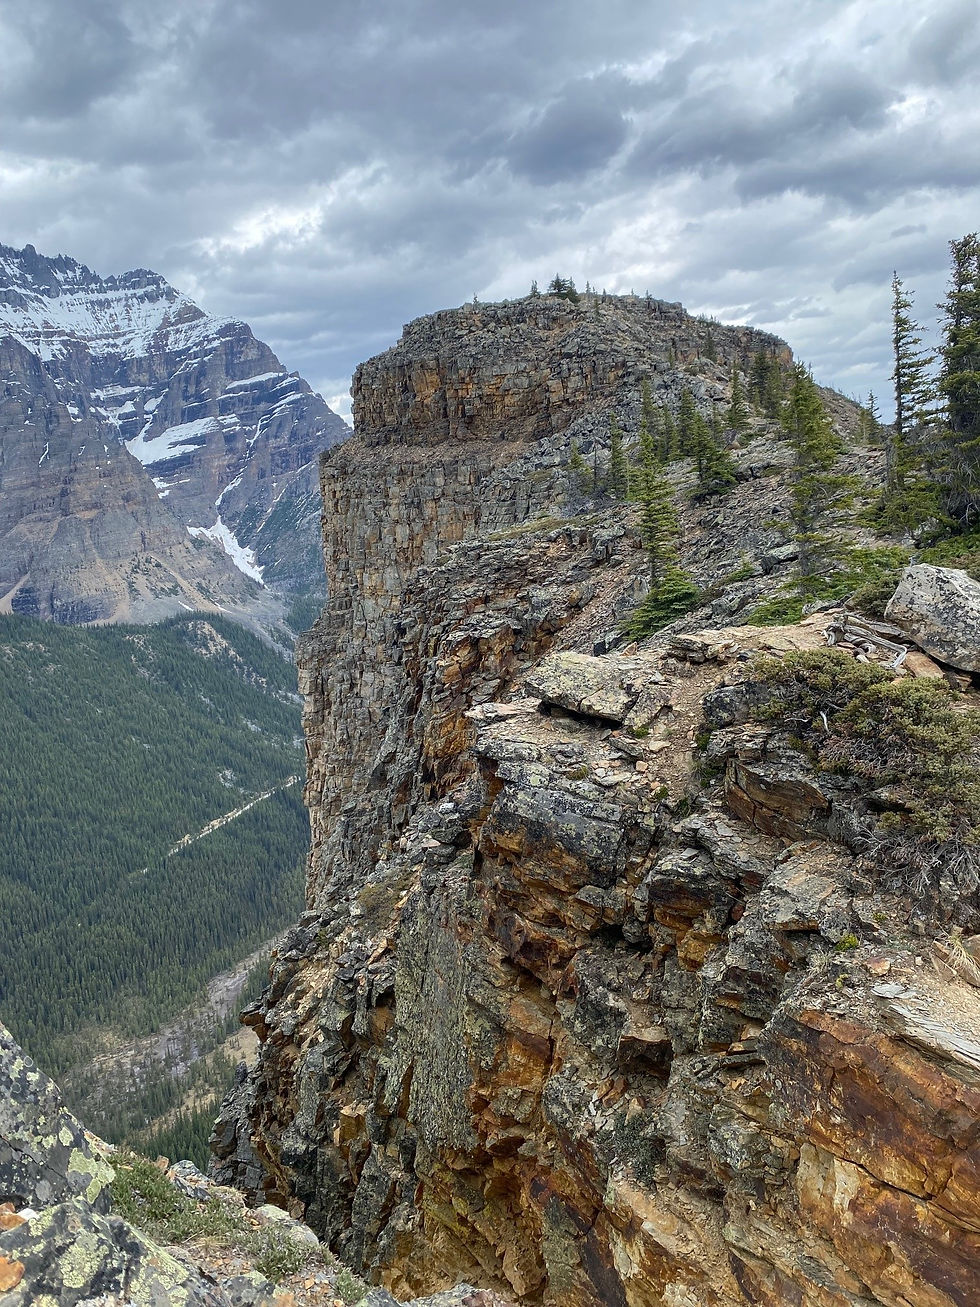
Once you emerge from the chute, head left and follow the well-defined path up to the top of the Tower of Babel. There is a small section where you have to clamber up some rocks, but it's not overly difficult and there is no exposure. If you’ve made it this far, the rest is a breeze.

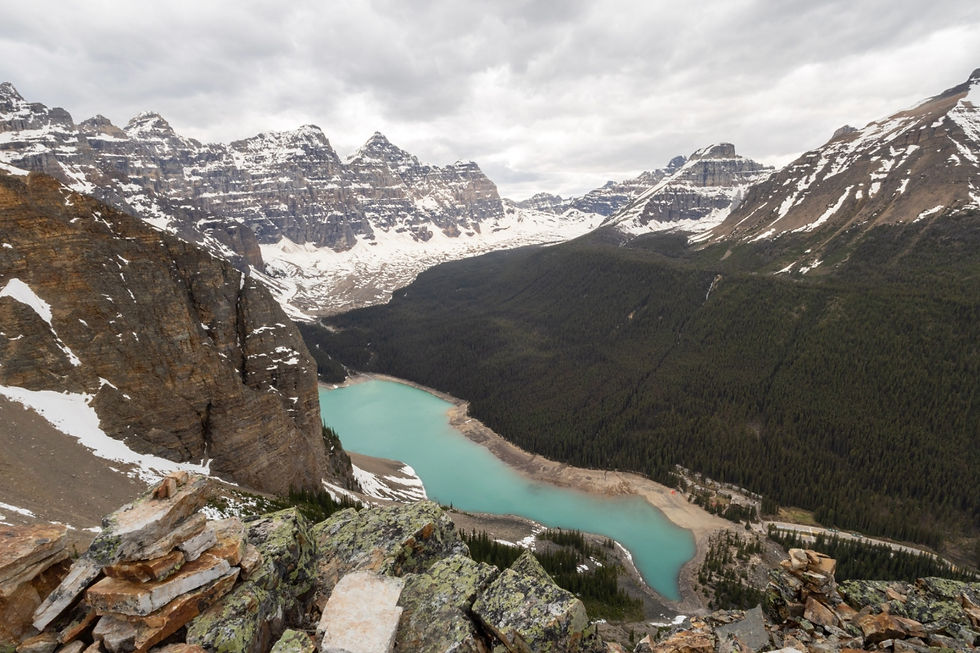
At the summit, a wide flat plateau offers incredible panoramic views. From all angles, the scenery is spectacular. You’ll see Moraine Lake, Mount Temple, Consolation Lakes and Valley, and even the Lake Louise Ski Resort.


The Descent
I’ll be honest - I was a little nervous about the descent. The climb was seriously steep, and a trip on the way down wouldn’t end well, plus I'd never 'scree surfed' before which only added to my anxiety! But honestly, it turned out to be a lots of fun once you get the hang of it.
Take your time navigating the rocky section of the chute. Once you're through the narrow part, stick to the right-hand side as you descend - it's the opposite side from where you came up, but there’s some great scree here that, if you're confident, can drastically speed up your descent.

If you’ve never tried scree surfing before, it’s not especially difficult, but it does take a bit of practice to get the hang of. Once you figure it out, it’s great fun.
Bend your knees and keep your weight slightly back - that way, if you fall, you’ll likely just land on your bum, which isn’t a big deal. Watch your footing as you go: aim for the loose scree rather than the solid rocks.
It’s counterintuitive at first, but the scree gives under your feet and lets you slide safely, while the bigger rocks are what can trip you up.
Be aware of any hikers climbing up the chute - you don't want to inadvertently send any rocks down on people below.
It’s definitely not perfect, but here’s a video of me giving it a go!
The Tower of Babel Scramble - FAQ
Is the Scramble kid-friendly?
No. The route is steep, technical, and requires hands-on scrambling, making it unsuitable for young children. Older kids like teenagers should be able to manage it though if they have a good level of fitness.
Is the Scramble Dog Friendly?
No. While some dogs could certainly do it, the risk of rockfall and the fact that you need both hands to scramble up would make it difficult to hold on to a leash, so leave the pup at home for this one.
Is there any Exposure?
In general, there isn’t any real exposure, meaning no deadly drop-offs. Inside the chute, there are sections that require some light rock climbing, and while a fall probably wouldn’t be fatal, it could definitely cause injury.
The final path to the summit is less exposed that you would expect, but you still want to stay well away from the edges at the top.
What Wildlife Might I Encounter on the Trail?
Along the scramble you’re likely to see small animals like marmots, pikas, and chipmunks. I wasn’t expecting it, but one of the things I really enjoyed was spotting wildflowers nestled into the rocks on the way up the chute — it’s amazing how they grow there.
The Canadian Rockies are bear country, so be bear aware. Make noise as you hike, carry bear spray, and know how to use it.
Do I need a Permit or Park Pass?
You will require a National Park Pass as the Tower of Babel Scramble is located in Banff National Park. We have written a Q&A blog post to answer all of your questions about the pass here.
What to Take With You
Good Hiking boots – Sturdy hiking boots with good grip are a must. The scramble involves steep rocky sections where solid footing matters. In early season or late fall, traction devices like microspikes might be needed if there’s snow or ice.
Traction Devices - Our girls wear Kids Ice Cleats by High Stream Gear that we bought from Amazon. They've worn them a few times and we are really happy with them so far. Me and Susie both have the Kahtoola MICROspikes and really like those as well. Neither of these are affiliate links; just products that we like.
Hiking poles – Not essential for the scramble itself since you’ll need your hands for climbing, but poles definitely would help on the descent when scree surfing.
Food and Water – Bring plenty of snacks and water for this one! I was munching on energy bars, chocolate covered pretzels, raisins and of course, a summit beer.
Dress in Layers - Weather can change quickly in the mountains. Dressing in layers lets you adjust to whatever comes your way
First Aid Kit – I always recommend bringing a basic first aid kit in your bag as a precaution. Evelyn fell over on this one and we needed to fix her up - it doesn't take up much space in your bag.
Bear spray – This hike is in bear country so bring bear spray if doing this hike in the summer.
Enjoy Scrambling the Tower of Babel
If you enjoyed this hike, why not try some of our other favourites in the Canadian Rockies?
The McGillivray Creek Trail (leads to a large chockstone wedged between canyon walls
The Grotto Canyon (a great hike in both summer and winter)
The Jura Creek Hike (also great in the summer and winter)
Canyon Creek Ice Cave (Involves a bike ride followed by a short scramble to the ice caves)
Ha Ling Peak (a challenging but rewarding first summit for kids)
Bike Ride to Moraine Lake (a tough but rewarding ride)
As always, if you have any questions about the hike feel free to ask away in the comments section!


Comments