.png)
Tent Ridge Horseshoe Hike: Trail Info, Tips & What to Expect
- Jul 17, 2025
- 10 min read
Updated: Aug 25, 2025

I hiked Tent Ridge for the first time recently with a friend and it quickly became one of the most memorable trails I’ve done in Kananaskis.
The route forms a loop around a high alpine bowl and delivers incredible views almost the entire way, with a thrilling ridge walk above Spray Lakes and sweeping views toward Mount Smuts and the Smith Dorrien valley.
This is not a beginner-friendly trail. It’s over 10 km with significant elevation gain, and parts of the ridge are narrow and a little exposed, with a few sections where you’ll need to use your hands to scramble. But if you’re a confident hiker, the rewards are more than worth it.
After more than a decade of exploring the Rockies, this easily ranks among the most scenic and satisfying hikes I’ve done.
In this post, I’ll share what the hike was like from start to finish, including how challenging the scramble section felt, what to expect on the ridge, and plenty of photos so you can get a clear idea of the terrain along the way.

Table of Contents
To jump ahead to a certain section, click the links below:
Table of Contents:
Tent Ridge Hike - Key Information
In a rush? Here's some key information about the hike at a glance.
Distance: Approximately 10.5 km horseshoe loop according to my tracker
Elevation Gain: Around 750-800 m
Difficulty: Moderately challenging with some scramble sections
Trail Type: Loop
Time Required: 4.5 to 6 hours depending on pace and breaks
Best Time to Go: Late June through October (once snow has melted). Fall is especially pretty as the golden larches are on show in mid to late September.
Permits Required: Yes – a Kananaskis Conservation Pass is required
Dog Friendly: In general, I would say no. However, we did see one group with a small dog. You would need to be comfortable helping them up and down the scramble sections.
Kid Friendly: Older kids should be able to manage it, depending on experience. The ridge has some minor exposure that requires hands-on scrambling, and there is some significant elevation gain.
Route Direction: Most hikers complete it in clockwise direction as it is easier to climb up than down the scramble sections, but you can do it both ways.
How to Get to the Trailhead
The Tent Ridge Horseshoe trailhead sits deep in Spray Valley Provincial Park and is accessible via the Smith Dorrien Trail (Highway 742), which is a gravel road running between Canmore and Kananaskis Lakes.
If you're travelling from Calgary, there are two main ways to reach the trailhead. The most direct route is to head west on Highway 1 and exit onto Highway 40 toward Kananaskis. Follow it past Kananaskis Village, then turn right onto the Smith Dorrien Trail.
Alternatively, you can stay on Highway 1 to Canmore and take the Smith Dorrien Trail south. This is also the route you would take if you are starting in Canmore / Banff.
Both routes take between 2 and 2.5 hours from Calgary, and include a long stretch of gravel road. When you turn off onto Mount Shark Road, you will immediately see Mount Engadine Lodge. Keep driving past the lodge and the Tent Ridge trailhead will be a short way up the road on your left.
There is a small dirt parking area labeled Tent Ridge Horseshoe Trailhead on Google Maps, but most people hike the loop in a clockwise direction. If you're doing it that way, it's better to park along the road so you're closer to the actual start of the trail, about 250 metres back. If you reach the Bryant Creek trailhead parking lot, you’ve gone too far.
Note: There are no services along the Smith Dorrien Trail and cellphone reception is limited. Bring everything you need and be prepared for changing mountain conditions.
Tent Ridge Map:
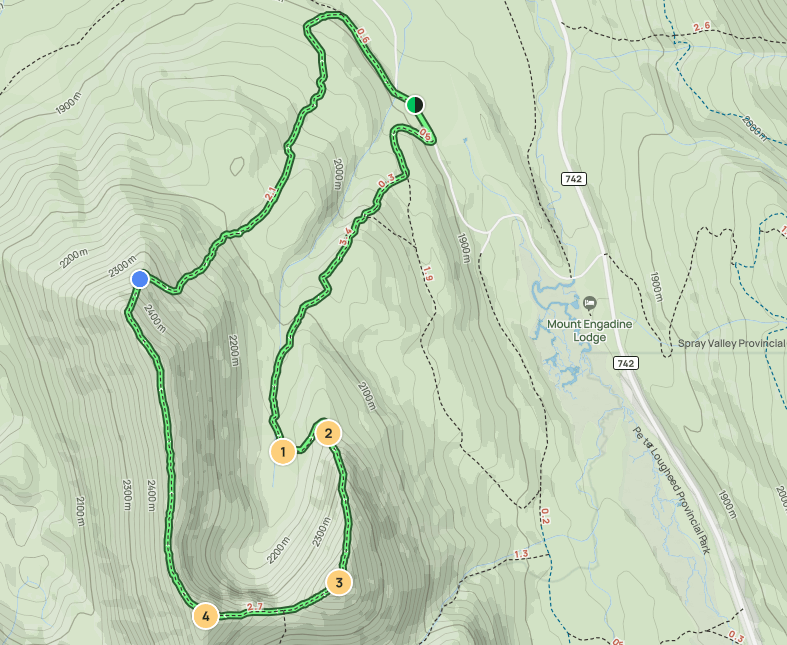
Key
The Meadow
The 1st Scramble
The weather station
Tent Ridge Summit
The Hike to the Meadow
Assuming you’re doing the hike clockwise like most people, the trail begins on a narrow dirt path that winds through an open treed area before quickly transitioning into denser forest.

After about 0.7 kilometres, you’ll reach a fork where you need to take the right-hand path. Some logs have been placed across the left fork to discourage people from going the wrong way, but the turn isn’t particularly obvious. If you miss it and continue straight, you’ll end up at Tryst Lake (so don't do that).
A little further on, once you are deeper in the forest, you will reach an obvious T-junction where you need to turn left.
We always download the route map on AllTrails before heading out and have found it invaluable. It has stopped us going the wrong way so many times!

The trail continues through the trees before opening into a meadow in the Monica Basin. This area is known for bear activity, and we were told by hikers coming the other way that a mama bear and cubs were close to the trail.
As it happens we didn't see the bears at all, but its an important reminder to stay bear aware. Hike in a group if you can, carry bear spray, and know how to use it.
At the far end of the meadow, the trail forks clearly to the left. Follow it through a patch of trees and you will soon reach the start of the ridge.

Ridge Ascent and Scramble Sections
As you leave the meadow and begin climbing the ridge through the trees, you’ll soon emerge from the forest and get your first clear view of the ridge ahead. The first scramble section comes into view here and I thought it looked pretty intimidating at first.


As you continue along the well-worn trail, the incline becomes steeper, but there is nothing technically difficult about it. Be sure to take water breaks and look back occasionally as the views over Spray Lakes start to open up behind you. It's pretty spectacular!
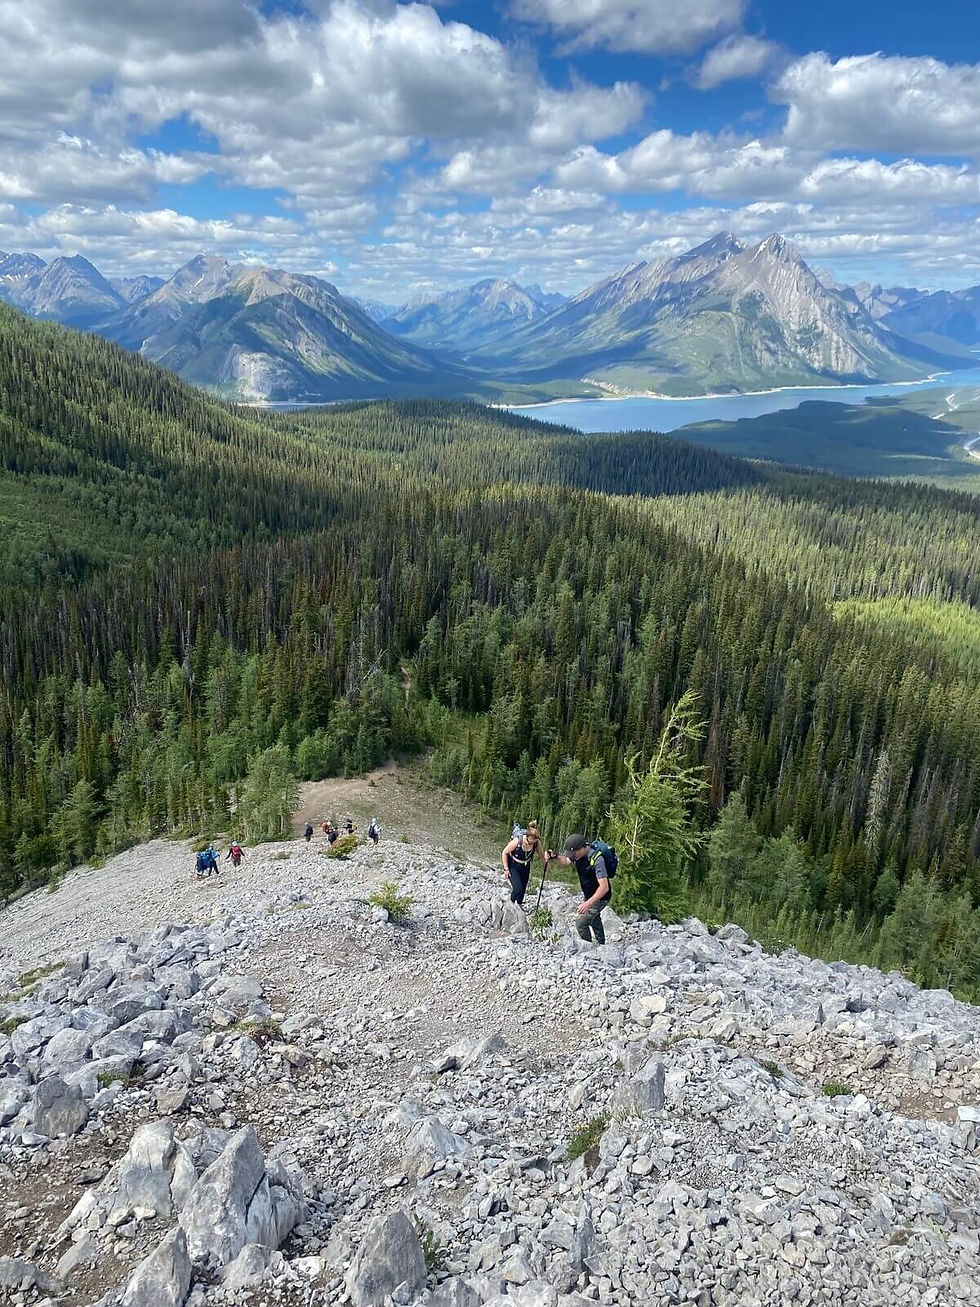
At the base of the first scramble, you have a couple of options.
Option 1 is to head straight up the face, which is fairly straightforward if you stay near the center, as there is little to no exposure.

If you prefer not to scramble, Option 2 would be to take a small path that cuts around to the right and bypasses the climb entirely.
If you aren't comfortable with the scramble, or you are hiking with young children, this would be a good turnaround point as you will still experience great views of Spray Lakes.

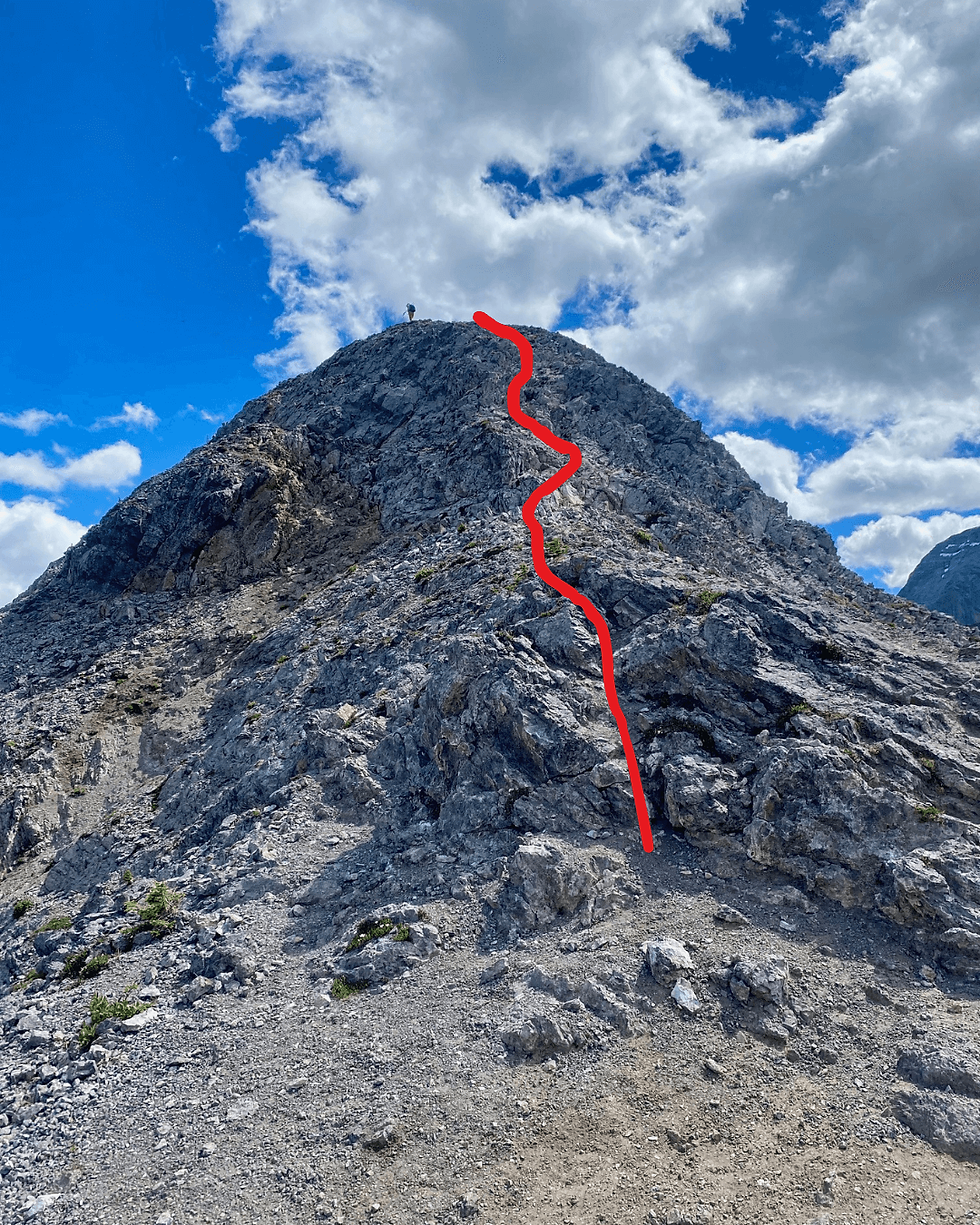
The trail continues to wind upward toward the second scramble, which looks a bit steep from below. But after watching the group ahead of us climb it with ease, we felt more confident that it wouldn’t be too difficult.
Once I started climbing, I found it more enjoyable than difficult to be honest. I basically bear-crawled my way up, sticking to the center of the rock face. You can see the approximate route in the photo below.

Is the Scramble Section Suitable for Kids?
Personally, I would describe both scramble sections as more fun than scary. A fall here would definitely hurt, especially on the jagged rocks, but at no point did I feel like I was in danger of falling off a cliff. It is very much a hands-on scramble, but as long as you take your time and keep three points of contact, it felt solid and manageable.
Although my kids were not with me on this hike, I genuinely think our girls (aged 8 and 10) could have navigated these scramble sections with my help, and I think they would have loved it. Finding interesting / challenging sections on hikes like this is one of our favourite tips for hiking with kids, and keeping them engaged.
The good news is that once you are past these two scramble sections, the rest of the route along the ridge is steep in places but does not involve any more hands-on climbing.


The Weather Station and Final Summit Push

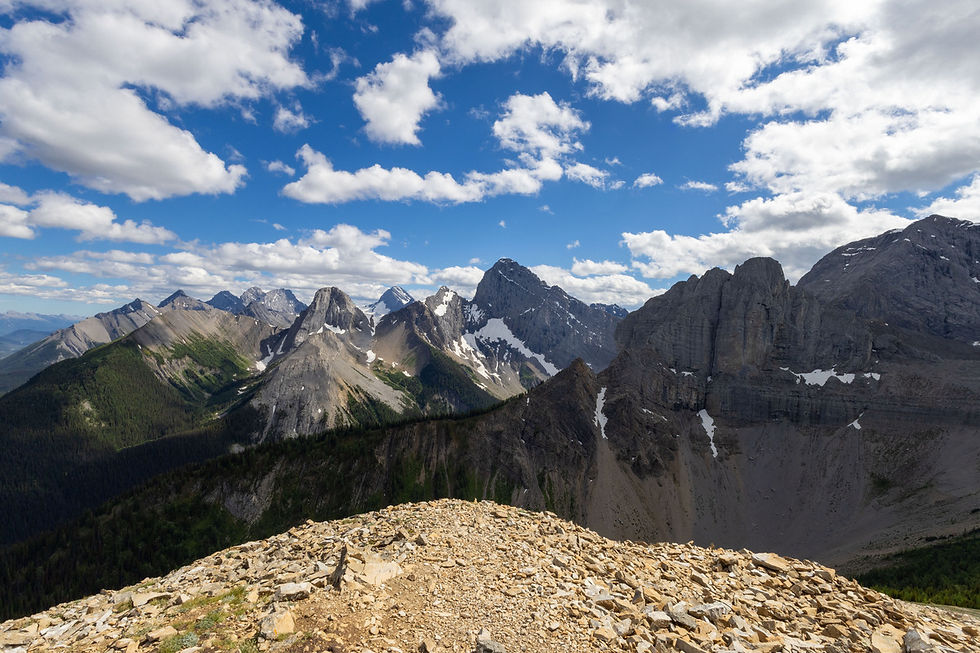
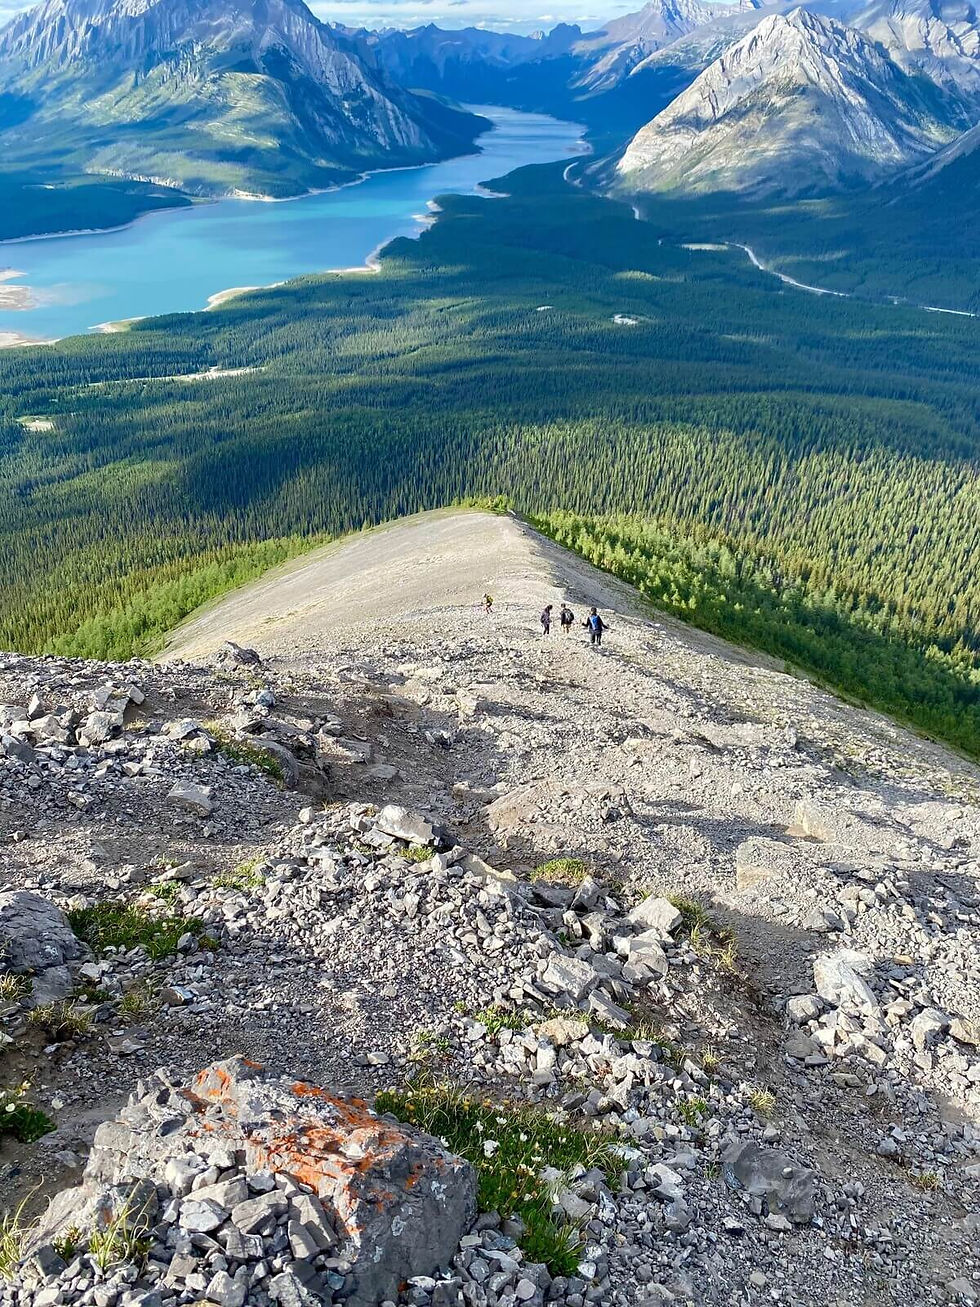
When you reach the weather station summit, the views are spectacular. You'll be treated to panoramic views of Spray Lakes, the surrounding Spray Valley peaks, and the full ridge you just climbed, plus you'll now see the Smith Dorrien valley, Lake Tryst and the imposing Mount Fist and Mount Smut range.
It is a great place to pause for a snack, catch your breath, and soak in the scenery.


From the weather station, the trail descends along a loose scree path before starting the final climb to the true summit. It is definitely a tough pill to swallow having to lose that elevation, only to head straight back up again, and this time, even higher than before.


Tent Ridge Walk & Final Descent
From the true summit, the views are equally stunning. You can now see the western side of the Tent Ridge horseshoe and the valley far below. To the northwest, Cone Mountain rises in the distance, and Watridge Lake is visible tucked into the trees below.

Take care as you begin the descent from the summit along the ridge. While the trail isn’t technically difficult, there are a few mildly exposed sections where a slip could have serious consequences. The path is rocky in places, with some larger boulders to navigate, so watch your footing.


After passing the rocky stretch, the ridge opens into a beautiful wide and easy walk. There were some amazing wildflowers here when we hiked in early July.

The path then descends steeply along a well-defined but slippery scree slope. This was by far the toughest part of the hike for me and felt longer than expected. After that, you’ll re-enter the forest and eventually reach the road.
At the end of the scree section, you’ll find some of the best views of Spray Lakes anywhere in Kananaskis. We passed several groups heading up to catch sunset photos here, including an entire wedding party!

I don’t have any photos of the final stretch through the forest as I think we were in a rush to get back to the car! Just keep following the path and you’ll eventually reach the road.
The Tent Ridge Hike - FAQ
Can I do the loop clockwise or anti-clockwise? Which is better?
You can hike the loop either clockwise or anti-clockwise. Most people choose clockwise because the scrambles are easier to climb up than down.
Is the Hike Kid-Friendly?
This hike is not recommended for young children or inexperienced hikers. The distance, significant elevation gain, and scrambling sections require good fitness, and there are some exposed areas along the trail. That said, most active kids aged 10 and up should be able to complete it if they can handle the distance and elevation.
Is the Hike Dog-Friendly?
Dogs are allowed on the trail but it would be difficult for many dogs to navigate the scramble sections, so consider your dog’s comfort with scrambling and rough terrain.
Are There Any Washrooms / Toilets?
No, there are no washrooms available at the parking lot or along the trail. Plan accordingly!
What Wildlife Might I Encounter on the Trail?
This is definitely bear country. We saw a grizzly and cubs along the road not far from the trail start and were advised bears were in the area near the trail, though we didn’t see any. Be bear aware, hike in groups, make noise, carry bear spray, and stay alert.
Can you Hike This Trail in Winter?
Winter hiking is not recommended on this trail. The best time to hike is between June and October, with larch season being especially beautiful.
What to Take With You
Good Hiking boots
Make sure the whole family has some good hiking boots. There are some scramble sections and you definitely want to make sure you have sure footing.
Hiking poles
Hiking poles would REALLY come in handy on the descent as there is quite a bit of scree to navigate and it can get hard on the knees.
Food and Water
We recently got Camelbaks for both kids so they can drink on the go, and it’s been a total game changer! Don’t forget to pack plenty of snacks and some gummy treats too! There are no rivers or streams to fill up your water so make sure you have enough.
First Aid Kit
I always suggest carrying a basic first aid kit, and this was especially relevant on this hike as we bumped into a hiker who was suffering from severe dehydration and projectile vomiting. Thankfully we met a nurse who had some electrolyte tablets but it was a timely reminder to be prepared both for those in your group and fellow hikers.
Dress in Layers
Weather can change quickly in the mountains. Dressing in layers lets you adjust to whatever comes your way
Bear spray
This hike is in bear country, so bring bear spray, keep it within reach, and make sure you know how to use it.
Looking for More Hikes in the Area?
If you enjoyed this hike, why not try some of our other favourites in the area?
The West Wind Pass (equally impressive views over Spray Lakes, but kid-friendly)
The McGillivray Creek Trail (leads to a large chockstone wedged between canyon walls
The Grotto Canyon (a great hike in both summer and winter)
The Jura Creek Hike (also great in the summer and winter)
Canyon Creek Ice Cave (Involves a bike ride followed by a short scramble to the ice caves)
Ha Ling Peak (a challenging but rewarding first summit for kids)
If you are looking for accommodation, we recommend both of these hotels - they are on the higher end, but make for a really special stay:
MTN House by Basecamp (a spa is opening up in November 2025)
Kananaskis Mountain Lodge (a luxury hotel in Kananaskis country which recently hosted the G7 Summit, includes an outdoor heated swimming pool and next to the Nordic Spa)
As always, if you have any questions about the hike feel free to ask away in the comments section!


Comments